Overview
This is a Citrix AppDNA 7.5 Installation Guide. The operating system utilized for this guide is Windows 2008 R2. Please review all necessary system requirements before installation.
Step-by-Step Instructions
1. Launch the Citrix AppDNA installer (Citrix-AppDNA.msi). Click Next on the Welcome to the Installation Wizard.

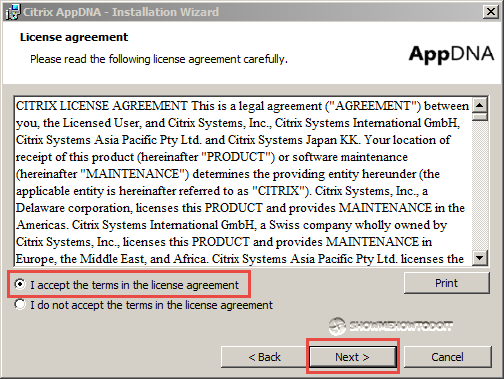
2. Select the “I accept the terms in the license agreement” option and click Next.
3. Select “Complete (server + client) and click Next.

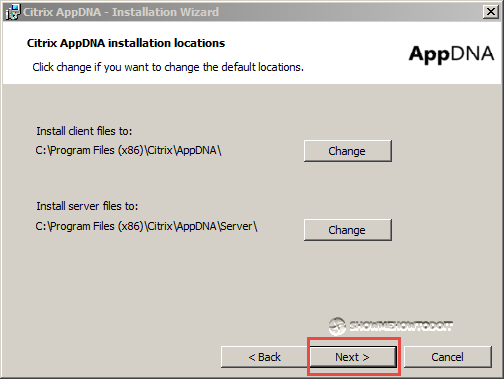
4. At the Citrix AppDNS installation locations, accept the defaults and click Next.
6. Click Install on the Ready to install Citrix AppDNA.

7. Click Finish on the Installation Wizard Completed.
Note: The Launch the Configuration Wizard to configure this new installation is checked.
8. The Configure AppDNA Wizard will launch. The only available option is “Configure a new installation”. Click Next.

9. The only available option is “Production Web server”. Click Next.

10. On the Database creation ensure that you populate the correct SQL Server name including the SQL Instance. In our example, we utilize SQL Express with the default installation options which installs instance “SQLEXPRESS”.
The server name is NYAPPDNA02 (Substitute for your own SQL Server name)
The SQL Instance is SQLEXPRESS (Substitute for your instance name)
The default database name is AppDNADB (you can substitute another name)
Database Authentication: Leave the default option of Windows authentication but you can always utilize SQL authentication. The trend is to utilize Windows authentication. Since we utilize a locally installed SQL Express with an account that has full SQL access, we will be able to create and populate the database.
Click Next to continue.

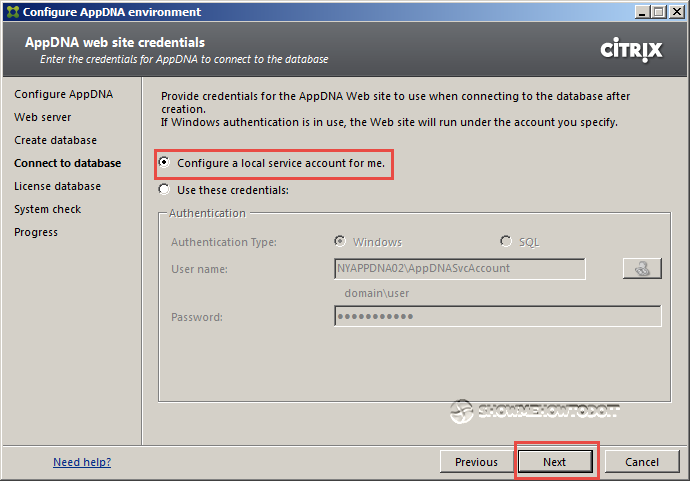
11. In the AppDNA web site credentials, select the default option “Configure a local service account for me” and click Next. You can also utilize alternate credentials in the form of a domain service account such as DOMAIN\svc_appdnauser. You can always adjust these credentials later.
12. In the License database dialog, select the “Run in trial mode” and click Next. You can review the following Citrix Blog article with some basic information on AppDNA 7.5 licensing changes.

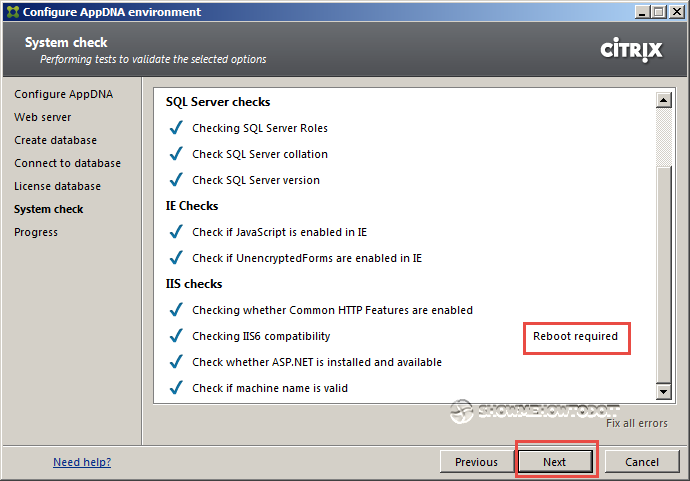
13. The System Check dialog will perform a quick check and let you know if there is something that needs to be addressed. In our situation “checking IIS6 compatibility” failed and provided us with an option to fix. Clicking on Fix on the right side of “Checking IIS6 compatibility” (not shown here) corrected the issue with a note that a Reboot is required. (The reboot can be initiated later.)
Click Next to continue.

14. The “Configuring your AppDNA environment” will consume quite some time as it populates the database with image information for the various Windows operating systems. You will most likely do something else while this step is being completed.
Once the process is complete, you will notice that it outputs the local account created and the password. If you have used an existing domain account, this would not have been shown.
Click Close.

16. Reboot the computer. This completes the basic installation.