This is a simple guide on how to upgrade NetScaler 10.1 to 10.5 utilizing the NetScaler GUI interface. There is a command line option but for a limited number of NetScaler appliances, the GUI option can be a quick and efficient approach.
As with any roll-out/upgrade, there are certain steps to be followed and Citrix provides a “Best Practices for Upgrading NetScaler or Access Gateway Enterprise Edition Appliances” article on how to go about it. This article emphasizes the need to follow a Change Control process, ensuring that you have adequate support options, backup and testing. The focus of the article is on command line tools as the NetScaler GUI could be problematic especially when utilizing the latest version of Java. This guide assumes that the NetScaler GUI is functioning properly on the client computer to be utilized for the upgrade process.
A NetScaler VPX appliance running on VMware vSphere has been utilized for this documentation.
The basic steps would be:
- Firmware Download
- Backup
- Upgrade
- Test
If possible, perform this process in a lab environment first, compile test instructions and perform a roll-back before performing these steps in production.
Firmware Download
Download the appropriate NetScaler firmware from the Citrix website. In order to do so, you will need to have a Citrix account. Citrix releases frequent updates, so your view may present additional builds. For this article, the latest Build number was 54.9.
We will not be downloading the complete appliance software, only the update.
Download the firmware.
Backup
NetScaler 10.1 and later offer a nice Backup GUI capability that offers two backup options: Basic or Full. The following Citrix eDocs “Backing up a NetScaler Appliance” provides a list of files and directories that each type of backup performs. In our case we will perform a Basic and a Full Backup.
Connect to the NetScaler portal and navigate to Configuration, expand System, click on Backup and Restore, click on Backup. Complete the required fields and please enter a descriptive Comment that will make it easier to identify the backup. Perform a backup for both Basic and Full.
The backup files are in tgz format and are saved directly on the NetScaler appliance. This enables you to restore backups directly from the appliance. These are not snapshot backups but configuration backups. You will not be able to revert to a previous version of NetScaler utilizing these backups alone.
Now we will need to save these backups to a safe location. For this article, we are utilizing WinSCP which can be downloaded from the WinSCP site.
Connect to the NetScaler, navigate to /var/ns_sys_backup, identify the specific backup files and copy them to a safe location.
It would also be advisable to perform a virtual machine backup as well if this is a NetScaler VPX edition utilizing your tool of choice.
Upgrade
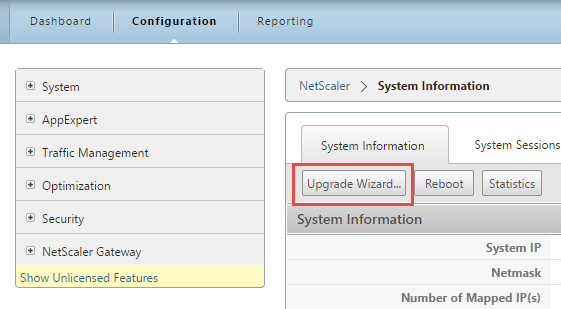
The upgrade process is quite easy. You will simply need to launch the Upgrade Wizard and follow the prompts. Navigate to Configuration and click on Upgrade Wizard.
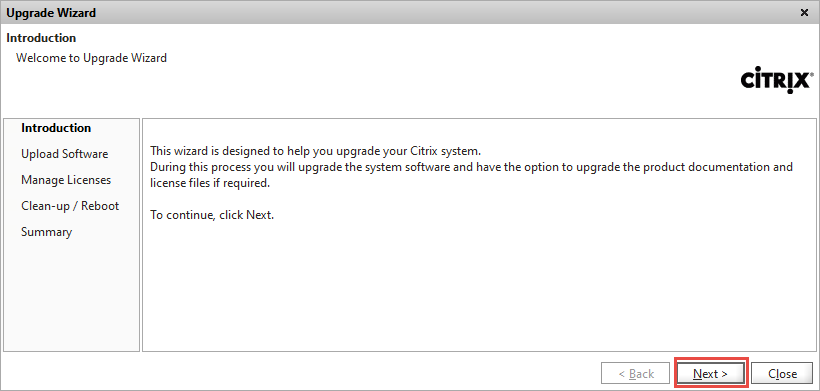
Click Next on the Introduction dialog.
Browse to the location you saved the firmware file, select it and click Next.
The Manage Licenses will display the currently installed licenses.
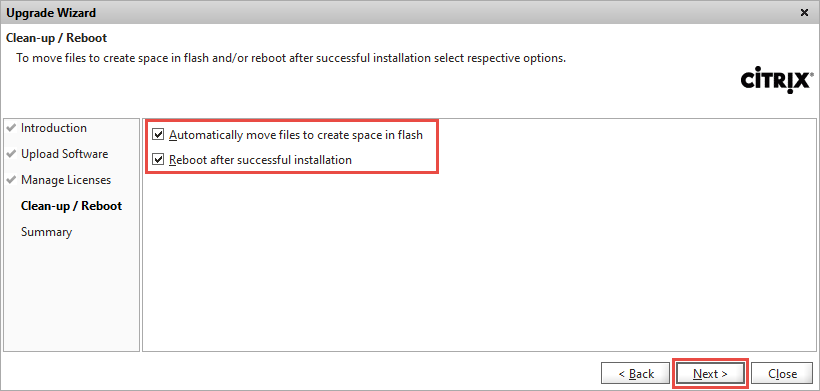
Check both options and click Next. You may want to select the appropriate options for your own environment and internal procedures.
Click Finish to proceed with the upgrade.
At this stage, the Wizard will upload the firmware file to the NetScaler appliance, update it and reboot.
Testing
Once the upgraded appliance is up and running, log on to the NetScaler portal and proceed with testing. It is important to have a test instructions compiled ahead of time in order to identify issues quickly and initiate a roll-back plan in case the test is unsuccessful.


